
 Jane and John's RV pages
Making the most of the space under the bathroom sink
March 12, 2009
Converting 'hidden' space to usable storage space on our former sailboat and now on our coach is a very satisfying and rewarding experience. It is a creative endeavour, and for me as a amateur wood and metal worker, an opportunity to use all of the equipment I have spent years accumulating, and the training and experience I have nurtured for so long (and mistakes suffered.)
Dear Wife Jane has been lovingly after me for about 2.5 years of our almost four year (as I write this) ownership of our Horizon to convert the space under the bathroom sink to full storage instead of the Winnebago designed diminutive area. Winnebago had plumbing under the sink, and for production efficiencies, blocked off access to the plumbing unlike what you would typically find under most house sinks. It was nice to not see the plumbing, but it came at a steep price - it reduced the storage space to maybe 1/4th of what it could be. (Also we accumulated quite a bit of dust in the area due to the space being open to the plumbing bay - we had dust intrusion in the plumbing bay which made its way up to this space.)
A side-note of thanks to our friends from California, Cliff and Mary Zimmerman, who own a sister model, for providing Jane (and me) the inspiration for this modification. It is with a little modicum of pride that I take complete credit for the swing-out storage tray you will see.
Removing the factory base and partition was a quick and simple operation - this exposed the working area I had. Cardboard was used as a template to cut 1/2" Chinese birch plywood (oh my gosh - what horrible stuff!) I made a fiddle (front lip) from poplar. Actually, all of the wood I used was from on-hand supplies except for the steel. (Once I use the Chinese ply up, I hope I am never so cheap that I buy it again.)
Since we had a leak under the sink sometime in the past, I applied two coats of oil-based polyurethane to the wood. After I cut and welded up the metal parts, I used my abrasive blaster and took the parts down to clean metal and immediately primed them (the only way to deal with effectively preventing rust.)
Speaking of metal, this is my first project to include metal working as part of the design. About a year ago I took a 12 session (two hours per) basic welding adult ed class and thought it would be fun to put my skills to task. (Welding might look simple, but trust me it is an art as well as a skill.) For this I used my 75 amp MIG wire welder and not my stick welder since with MIG and shielding gas, the welds are clean and there is no need to chip off the flux that you normally need to do with stick (electrode) welding.
Okay - let's check out the project in pictures:

Here's the "before" picture after I removed the bottom panel and vertical partition. Winnebago essentially placed all of the plumbing out of sight which is okay, but you give up a lot of space as a result

First order of business was to fit a new bottom panel which covered the entire area with cut-outs for the plumbing. There is a fiddle at the front to provide a lip to the area and you will notice the foam rubber I used to seal the area from the plumbing bay dust and to prevent chafe or abrasion on the plumbing.
At this point, the storage area is greatly increased, but I wanted a shelf about half-way up since this was essentially "dead" space. I toyed with several ideas - the one that had the most merit was the one that would be the most difficult to build - a swing-out shelf. (The black rectangle on the right side is the mounting plate I fabricated for the swing-out shelf - more on this later.)
Lets build the shelf!

When I have to deal with an irregular space, cardboard is my friend! I always get the shape I need from cardboard and then build it in wood. The swing-out shelf is 12" long on each straight side and the fiddles (sides) are 3" tall. (I used some scrap 1/8" Lauan for the sides.) The shelf is 3/4" crappy Chinese birch (birch? - who knows?) plywood.Building this shelf was the easy part - the metal frame turned out to be a bit of a challenge and took some trial and error to get it correct and functional.

I made a bending jig to get the shape I needed for the shelf support

The shelf support welded and painted. The rod stock is 3/8" steel, the frame stock is 3/4" by 1/8" steel and the 'tabs' are 1" by about 2" 1/8" steel

It's a little difficult to sequence the pictures so you can easily follow the project, so you might need to jump around to get the big picture. Here is the shelf bracket mounted to the shelf. I drilled and tapped the screw holes in the mounting tabs and used 1/4" FH stainless steel bolts to fasten the shelf to the support.
The orange looking area at the top of the shelf is where I 'burned' through the microscopically-thin outer ply layer while sanding. Another reason why I hate Chinese plywood (you also can't depend on its thickness to be constant, either!)

My new Nikon D80 DSLR under-exposed the flash pictures a little, so it is a little difficult to make out the detail (I'm still learning the nuances of the D80)
Anyway, here is the completed frame and mounting plate

Hinge plate close-up

The complete assembly less shelf. I had to mount the hinge plate assembly on a piece of 1/2" Chinese plywood (did I tell you how much I hate Chinese plywood?) since the wall of the sink cabinet was hollow with only thin Lauan plywood on the inside surface. With the plywood, I could screw the assembly into the frame of the cabinet providing good support
Now - let's put it all together. The completed project:


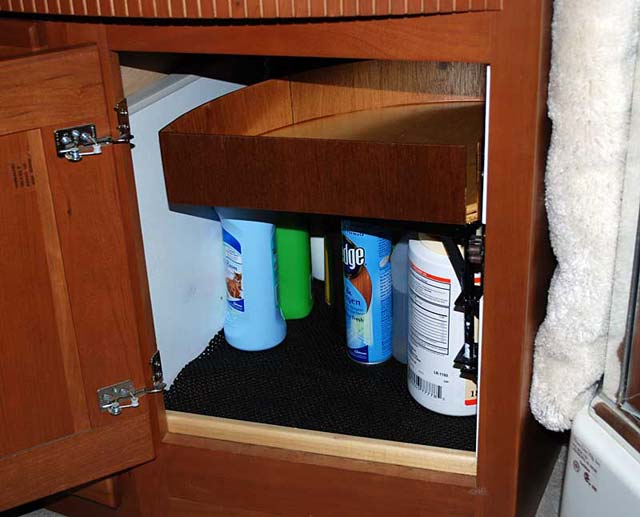
-End-